
TL;DR
Moving your rig into a closet can drastically reduce noise and improve sound quality. Proper placement, treatment, and ventilation are key. Foam isn’t enough—air gaps and heat management matter most.
Ever wondered if your tiny closet could double as a professional recording booth? The secret isn’t just foam panels or fancy mics. It’s about where you place your equipment, how you treat the space, and most importantly, how you manage heat and sound leaks.
If you’re looking to get better vocals, clearer podcasts, or quieter gaming sessions without blowing your budget, you’re in the right place. This guide breaks down the simple, practical steps to turn a cramped closet into a sound-smart studio or rig hideaway — with real-world tips and no fluff.
Acoustic dampening
& the rig in the closet.
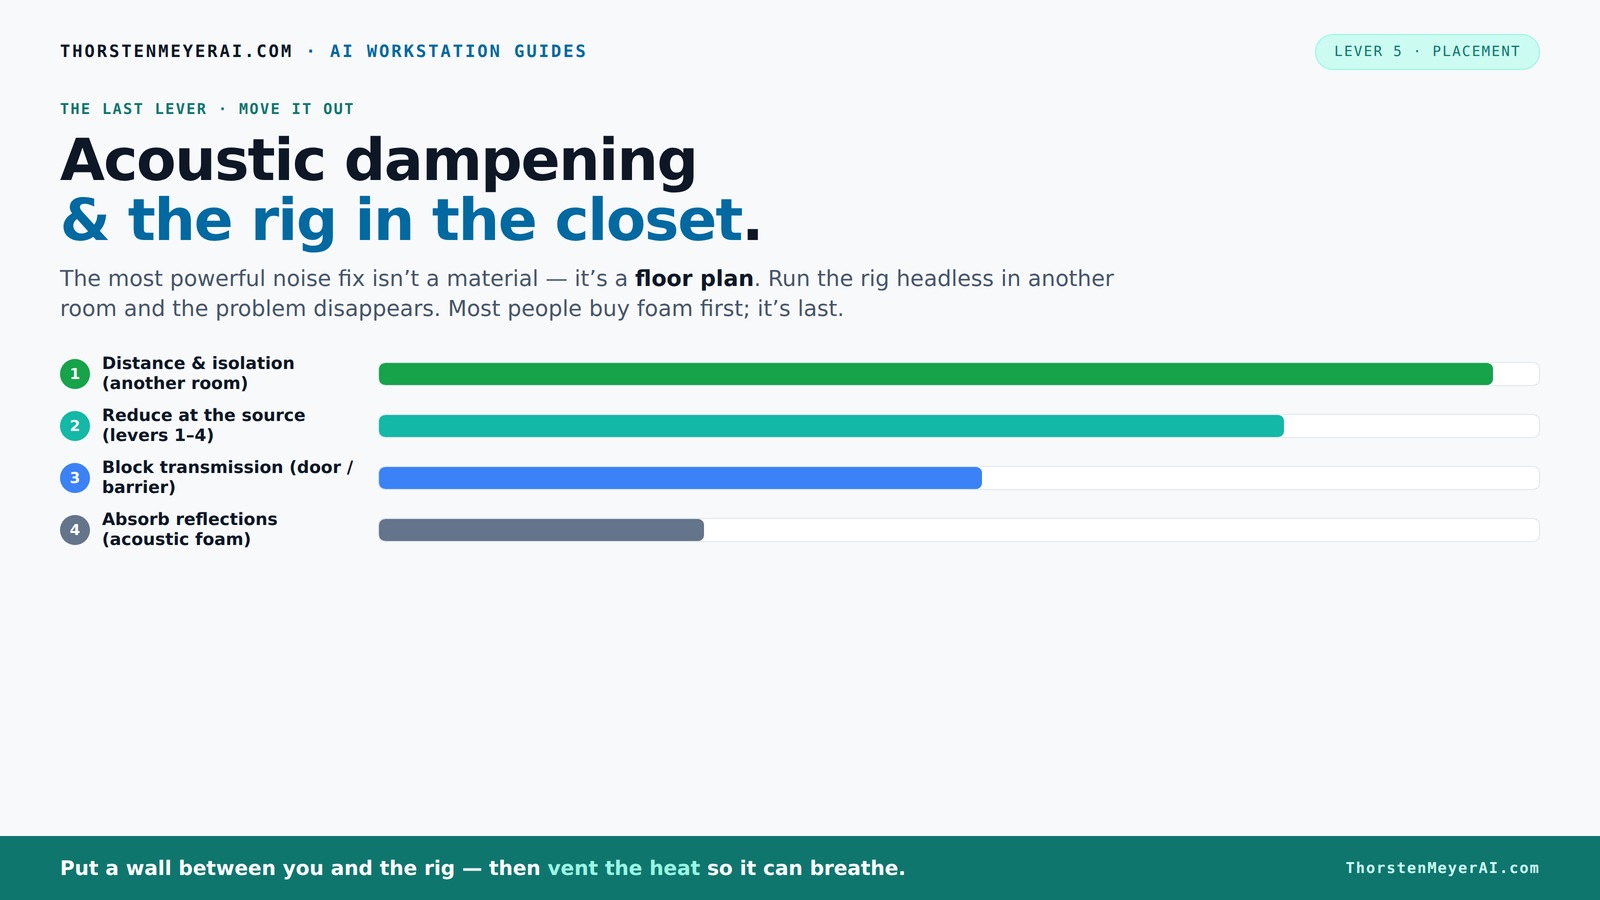
The most powerful noise fix isn’t a material — it’s a floor plan. A rig you can’t hear because it’s in another room beats any amount of foam. Tap the approaches in Part 1 to see what actually works.
(another room)
(levers 1–4)
(door / barrier)
(acoustic foam)
Contain the noise, not the heat
Key Takeaways
- Moving your rig into another room is the most effective way to eliminate noise without extra treatment.
- Proper ventilation is critical when placing a high-power machine in a closet to prevent overheating and throttling.
- Target reflection points for acoustic panels—behind the mic, side walls, overhead—to improve sound clarity.
- Sealing gaps around doors, outlets, and vents greatly reduces sound leaks in small spaces.
- Bass traps in corners are essential for controlling low frequencies and avoiding a muddy sound.

Ultimate Portable Vocal Booth for Home Recording, Reduces Echo & Reverb
- Recommended Portable Recording Booth: Featured by Rolling Stone as best sound booth
- Premium Sound Insulation: Uses heavy pro sound blankets for clear vocals
- Complete Recording Kit: Includes sound blankets, lighting, holder, and storage
As an affiliate, we earn on qualifying purchases.
As an affiliate, we earn on qualifying purchases.
How Moving Your Rig Can Save Your Sound (And Your Sanity)
Ever considered just moving your noisy rig into another room? It’s the easiest fix by far. When your computer, GPU, and fans roar behind a wall, the noise doesn’t bother you anymore. Instead of trying to muffle sound, you create distance. This is the most effective way to cut noise without adding a single piece of foam.
For example, I set up my AI workstation in a spare closet on the other side of the house. My workspace stayed silent, even during heavy training runs that used to shake my desk. All I needed was a reliable wired connection and a little ventilation.
The 'Rig in the Closet' Setup: How to Keep It Cool Without Overheating
Placing a high-performance PC or GPU in a closet sounds perfect—until it overheats. Trapped heat can turn your quiet space into a sauna, throttling performance and making fans scream. The trick? Ventilation. Think of it like a mini data center—hot air needs an exit, cool air needs an entry.
Use passive vents or, better yet, install a quiet exhaust fan. For serious setups, consider a soundproof cabinet with a built-in cooling system that combines acoustic treatment with airflow management. Check out this guide on [reducing heat and noise in your AI workstation](https://thorstenmeyerai.com/reduce-heat-noise-ai-workstation/). The key is balancing sound dampening with effective heat dissipation.
Where to Place Acoustic Panels in a Tiny Closet (And Why It Matters)
Positioning your sound treatment is everything. Acoustic dampening isn't about covering every surface; it’s about targeting the first reflection points and major sound paths. Place panels at the wall behind your mic, on side walls, and overhead where sound bounces most.
Imagine your closet as a tiny echo chamber. By installing foam or absorption panels at the reflection points, you reduce harsh, boxy sound and create a more controlled environment. This targeted approach matters because it directly influences how sound interacts within the space. If you treat only one area, sound waves will bounce unpredictably, causing muddiness or harshness. Proper placement ensures that sound is absorbed where it would otherwise reflect and cause problems, leading to clearer recordings and more professional audio quality.
Remember, small closets tend to trap bass and create standing waves. Adding bass traps in corners and sealing gaps around doors can keep low-end muddiness at bay, which is crucial for achieving a balanced sound spectrum that accurately reproduces vocals and instruments.
Door and Leak Treatments: How to Stop Sound from Escaping
Gaps around your closet door and outlets are sneaky sound leaks. Even tiny cracks let loud noise escape and external noise seep in. The best fix? Seal everything. Use weatherstripping around the door, acoustic sealant for gaps, and consider heavy blankets or foam for the door itself.
For example, I covered my closet door with moving blankets, overlapping the doorway. It’s not perfect soundproofing, but it significantly reduced echo and stopped my neighbors from hearing every vocal take. Sealing gaps not only minimizes sound leakage but also prevents external noise from contaminating your recordings. For more tips, visit this guide on acoustic dampening and placement. This is especially important because in small spaces, even minor leaks can drastically affect sound clarity. The tradeoff is that sealing can sometimes make ventilation more challenging, so you need to balance soundproofing with airflow considerations.
Sealing gaps is cheap, quick, and makes a big difference—especially in small spaces where every leak counts. Proper sealing ensures your sound stays contained, and external noise doesn't ruin your recordings or gaming experience.
Bass Traps and Reflection Control in Small Spaces
Bass frequencies pile up easily in tiny rooms, making vocals and instruments sound boomy or muddy. Bass traps in corners absorb these low-end waves and prevent standing waves from ruining your sound.
If your closet is less than 4x4 feet, adding thick bass traps can dramatically improve clarity. For example, I installed foam bass traps in my closet’s corners, reducing boominess during voice recordings. These traps work by absorbing low-frequency energy that otherwise reflects and amplifies in small spaces, creating muddiness. Without proper low-end control, recordings can sound hollow or boomy, which detracts from clarity. The tradeoff is that bass traps can be bulky and may require careful placement to avoid over-absorbing high frequencies. Properly installed, they balance the room’s acoustics, giving your recordings a professional edge.
In small spaces, controlling low frequencies is as important as dampening high echoes. Learn more about bass traps and reflection control. Skip the traps, and your recordings will sound hollow and boxy, making it harder to achieve a natural, balanced sound.
Budget-Friendly Tips for Better Closet Acoustics
You don’t need to max out your credit card to improve your closet sound. Simple DIY solutions work wonders. Use thick blankets, moving pads, or even thick curtains on walls and doorways. Rugs on the floor also cut down reflections.
For example, I layered old comforters and a few foam panels I bought for less than $50. The difference was night and day—less echo, clearer vocals, and quieter outside noise. While these solutions are cost-effective, they also require strategic placement to be most effective. Properly sealing gaps and placing absorption materials at reflection points enhances their impact. The tradeoff is that cheap materials might not last forever or may require frequent repositioning, but for small, temporary setups, they provide a significant upgrade at minimal cost.
Focus on sealing leaks, adding absorption at reflection points, and creating a buffer zone around your mic. These small steps save money but boost sound quality noticeably, making your DIY effort worthwhile.
How to Know When a Closet Just Isn’t Enough
Sometimes, no matter what you do, a tiny closet can’t handle your sound goals. If you’re still getting boomy vocals, external noise leaks, or ventilation issues, it’s time to think bigger. A dedicated room with proper acoustic treatment might be necessary.
For example, I tried to turn a closet into a full recording booth, but after a few weeks, heat and sound leaks became unmanageable. That’s when I moved to a basement room with proper insulation and ventilation, and the quality shot up. Recognizing these limitations is crucial; pushing beyond them can lead to frustration and compromised results. The tradeoff is that larger spaces cost more and require more effort to treat acoustically, but they offer a more reliable environment for professional-quality recordings. Use your closet as a temporary or supplementary space, but know its limits to avoid disappointment.
In essence, understanding the space’s constraints helps you make smarter choices about when to upgrade or relocate for optimal sound quality.
Frequently Asked Questions
Can a closet really work as a recording booth?
Yes, if you treat the reflections, seal leaks, and manage ventilation, a closet can produce professional-sounding vocals and podcasts. It’s all about controlling sound bounce and external noise.What’s the difference between acoustic treatment and soundproofing?
Acoustic treatment reduces echo and reflections inside a room, making sound clearer. Soundproofing blocks sound from escaping or entering, which requires barriers and sealing leaks—foam alone won’t do the latter.Where should acoustic panels go in a closet setup?
Focus on reflection points: behind your mic, on side walls, and overhead. Bass traps in corners help low-end control. Seal gaps around doors and outlets for best results.Do I need bass traps in a small closet?
Absolutely. Small closets tend to trap bass and cause an uneven sound. Bass traps in corners absorb low frequencies and prevent muddiness.How thick should acoustic panels be for voice recording?
Typically, 2-4 inch thick panels work well for voice. Thicker panels reach lower frequencies better, especially in small spaces with bass buildup.Conclusion
The best way to quiet your rig or improve your closet’s sound isn’t just more foam—it’s smart placement, sealing leaks, and managing heat. Think of your closet as a piece of a bigger puzzle, not the whole picture.
By focusing on where sound travels and how heat escapes, you can turn a tiny space into a surprisingly functional studio or gaming rig. Remember: sometimes, the best fix is simply moving it out of your hairline and into a better-ventilated, well-treated corner of your home.